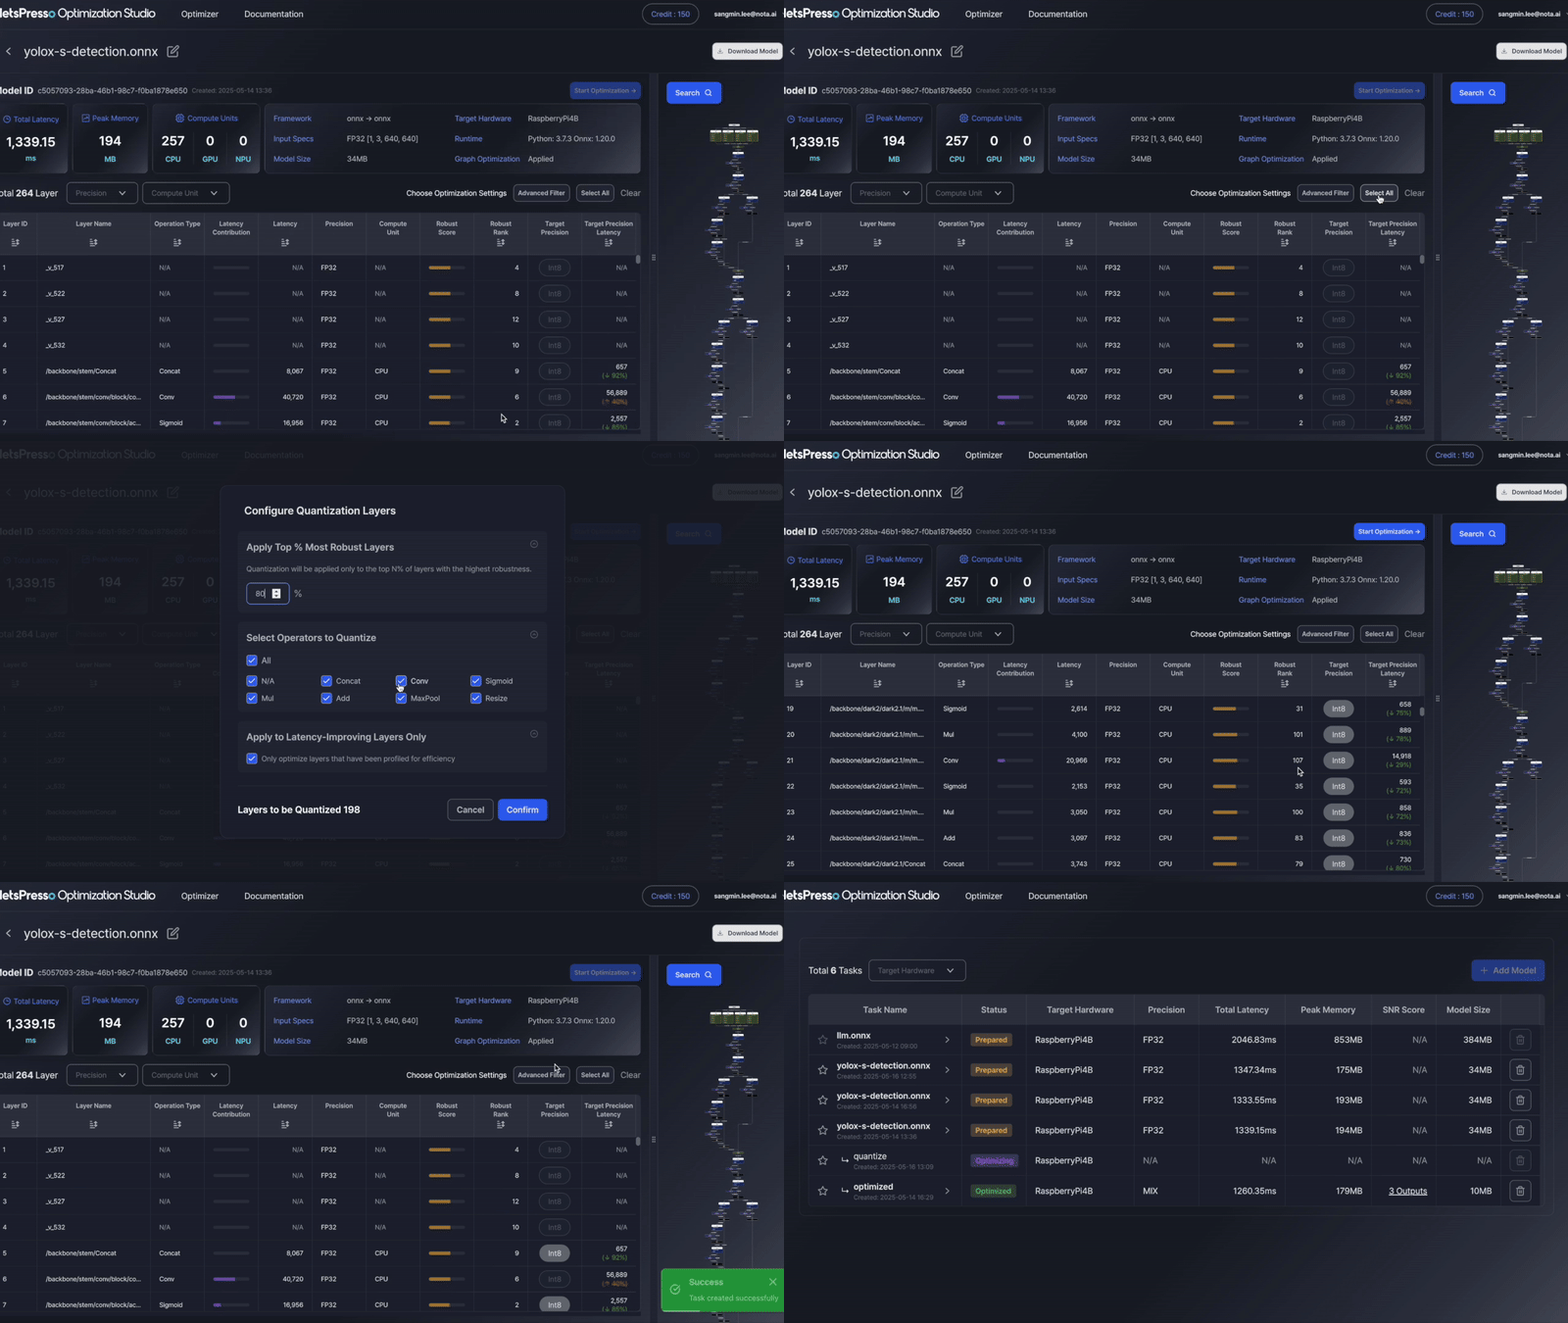
Step 3: Run optimization
In this step, you will configure and initiate quantization to optimize your model for target hardware.

NetsPresso provides multiple ways to set up your quantization strategy based on your preferred level of control:
Quantization Configuration Methods
You can choose from the following options to set quantization for your model layers:
-
Layer-wise Configuration
Manually review and set the target precision (e.g., INT8) for each layer individually.- Provides full control over which layers to quantize
- Useful for advanced users who want fine-grained customization
- Allows adjustments based on sensitivity or latency contribution per layer
-
Advanced Filter
-
Apply Top % Most Robust Layers
Quantize only the most robust layers based on internal sensitivity ranking. Example:70%will quantize the 70% of layers least sensitive to accuracy loss. -
Select Operators to Quantize
Choose which operation types (e.g., Conv, Add, Sigmoid) to include in quantization. You can also select "All" to apply to all supported operators. -
Apply to Latency-Improving Layers Only
Only quantize layers that help improve latency. -
Preview
The number of layers that match the current filters will be displayed (e.g.,Layers to be Quantized: 171).
-
-
Full INT8(Select all)
Automatically applies INT8 quantization to all supported layers in the model.- Fastest setup option with minimal configuration
- Suitable when maximum compression and minimal interaction are preferred
You can always clear and reconfigure settings using the Clear button.
Start Optimization
Once your configuration is complete, the Start Optimization → button becomes enabled.
Click this button to begin the quantization process.
- Optimization will be applied according to the selected configuration.
- Able to check the processing status in task list.
- Results can be reviewed in the next step.
Tips for Effective Quantization in Optimization Studio
Quantization can reduce model size and latency, but applying it blindly may hurt accuracy.
Here are some practical tips to help you achieve better results when optimizing:
1. Start with high-robustness layers
- Robustness Score shows how well a layer tolerates precision reduction (e.g., FP32 → INT8).
A higher score means lower risk of accuracy loss after quantization. - You can also refer to Robustness Rank to prioritize layers that are more quantization-friendly.
Tip: Start by quantizing layers with the highest scores or ranks.
2. Sort by Latency and target heavy layers first
- Use the Latency column to identify layers contributing most to inference time.
- Quantizing these layers can significantly reduce total model latency.
Tip: Sort by Latency → Quantize the top few layers → Measure the result.
3. Use Advanced Filter to narrow down layers
- The Advanced Filter tool helps you quickly find layers based on:
- Apply Top % Most Robust Layers
- Select Operators to Quantize
- Apply to Latency-Improving Layers Only
- This lets you focus on layers most worth optimizing.
Suggested workflow:
- Filter for moderate-to-high robustness (e.g., 50–80)
- Run optimization → Analyze result
- Re-run excluding any operator types that degraded performance
4.Repeat & compare — There is no perfect first try
- Quantization is not a one-shot process.
- Experiment iteratively:
- Try partial INT8 quantization
- Compare with Full INT8 (Select All)
- Re-adjust based on benchmark results
Tip: Don’t be afraid to try multiple configurations.
You'll often find the best result after a few attempts.
5. Observe optimization history & patterns
- Outside the layer table, you can view how total latency and robustness changed after each attempt.
- Use this to build intuition about which layer/operator combos are most sensitive.
Updated 9 months ago
